
前書き:flag(Go標準)のテスト方法ばかり検索ヒット
Go言語は、コマンドライン引数をパースする機能を持つflagパッケージが標準機能として提供されています。flagパッケージは、引数パース機能に対するユニットテストを簡単にするために、“flag.Commandline.Set()“が用意されています。
その一方で、OSSとして公開されているgo-flagsパッケージはどうでしょうか?flagパッケージよりも、go-flagsの方がコマンドライン引数を簡単に扱える特徴(ショート/ロングオプションサポート、Helpメッセージ自動生成など)がありますが、テスト用の仕組みが見当たりません。
Googleで検索しても、go-flagsパッケージによるコマンドライン引数パースをテストする方法が出てこなかったため、本記事ではその方法(ベストな方法ではなく、妥協した方法)を紹介します。
妥協案:os.Argsをテスト用の引数で上書き
まず、go-flagsパッケージを用いたコードの例として、以下を示します。n(name)オプションはオプション引数が必須ですが、それ以外のオプションはオプション引数が不要です。
package main
import (
"fmt"
"os"
"github.com/jessevdk/go-flags"
)
type options struct {
DryRun bool `short:"d" long:"dry-run" description:"Output the file renaming result to standard output (do not update the file)"`
Force bool `short:"f" long:"force" description:"Forcibly overwrite and save even if a file with the same name exists"`
Keep bool `short:"k" long:"keep" description:"Keep the file before renaming"`
Name string `short:"n" long:"name" value-name:"<name>" description:"Base file name with/without directory path (assign a serial number to this file name)"`
Prefix bool `short:"p" long:"prefix" description:"Add a serial number to the beginning of the file name"`
Suffix bool `short:"s" long:"suffix" description:"Add a serial number to the end of the file name(default)"`
}
func main() {
var opts options
var args = args(&opts)
os.Exit(0)
}
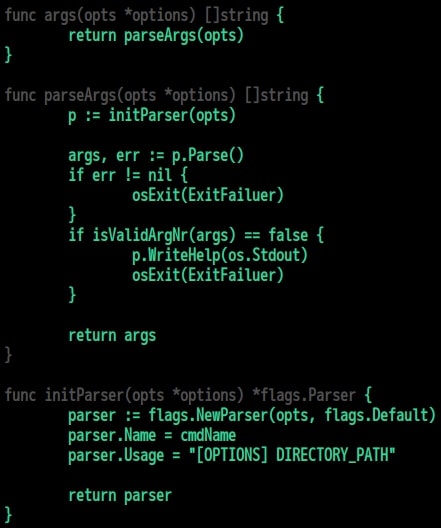
func args(opts *options) []string {
return parseArgs(opts)
}
func parseArgs(opts *options) []string {
p := initParser(opts)
args, err := p.Parse()
if err != nil {
os.Exit(ExitFailuer)
}
return args
}
func initParser(opts *options) *flags.Parser {
parser := flags.NewParser(opts, flags.Default)
parser.Name = "debimate"
parser.Usage = "[OPTIONS] DIRECTORY_PATH"
return parser
}
上記コードでは、args() -> parseArgs() -> Parse()の順で処理が進み、最終的にコマンドライン引数のパース結果(オプション情報)が変数optsに格納されます(オプション以外の情報は、os.Argsに残ります)。
args()メソッドに任意のコマンドライン引数を渡してユニットテストするには、主に3つの処理を実装します。
- テスト開始時に、os.Args(コマンドライン引数を保持するstring配列)をバックアップ
- os.Argsに任意のコマンドライン引数(string配列)を代入
- テスト終了後に、os.Argsを元の状態に復元
テストコードの実装例を以下に示します。
package main

import (
	"fmt"
	"os"
	"github.com/jessevdk/go-flags"
	"github.com/stretchr/testify/assert"
)

func TestArgs(t *testing.T) {
	var opts options
	// テスト開始時のコマンドライン引数をバックアップ
	backupArgs := os.Args

	// os.Argsに、テスト用のコマンドライン引数を代入
	testArgs := []string{"serial", "test", "-n", "name", "-p", "-s", "-d", "-k"}
	os.Args = testArgs

	// テスト実施
	a := args(&opts)

	// コマンドライン引数の復元
	os.Args = backupArgs

	// テスト結果の確認
	assert.Equal(t, "test", a[0])
	assert.Equal(t, "name", opts.Name)
	assert.Equal(t, true, opts.Prefix)
	assert.Equal(t, true, opts.Suffix)
	assert.Equal(t, true, opts.DryRun)
	assert.Equal(t, true, opts.Keep)
}
ユニットテスト実行直後は、テスト用のコマンドライン引数がos.Argsにセットされていますが、テストコード中で使われていないように見えました(コードベースの裏取りはしておらず、テスト実行時の挙動を見てそのように判断しました)。
カバレッジもキチンと取得されています(カバレッジ結果画像中のコードは、上記のテストコードと細部が異なりますが、大枠は同じです)
他に正しい方法があるかも知れません。しかし、今回紹介した方法でもgo-flagsパッケージに対するユニットテスト実施およびカバレッジ取得が出来ます。